Our Plant Policies and Planting Guide
We take pride in the wide selection and high quality of our nursery stock. Please!, make sure and KEEP YOUR RECEIPT. Our guarantee will be void without this proof of purchase!
OUR GUARANTEE: All trees and shrubs purchased from Young’s Nurseries are fully guaranteed for one full year from the date of purchase. All woody plants installed by Young’s are guaranteed for 2 full years, while labor costs for installation are guaranteed for 1 year. Only one replacement will be made. Transplanting work don on-site by Young’s is not guaranteed. This guarantee does not cover damage or partial dieback caused by severe seasonal conditions, animal browsing or mechanical injuries. Christmas trees, Roses, plants in above ground containers and all herbaceous plants (including Annuals, Perennials, Ground Covers, and Houseplants) are excluded from this guarantee. This guarantee is voided on ALL DISCOUNTED SALES and accounts not paid within 30 days of billing.
PLANTING AND CARE INSTRUCTIONS
 If you do not intend on planting immediately, make sure to set your new plants in a protected spot out of the wind and direct sun. Also, monitor them daily and make sure they are kept moist. The sooner you can get them planted, the happier they will be!
CHOOSING A SITE – Plants that are in good health when purchased will only continue to thrive if they are planted in the right environment. When possible, monitor the amount of shade or sun and extremes, such as unusually wet or dry soil before you purchase your plants, and remember that our nursery staff is always here to assist you in choosing the perfect plant for the perfect spot!
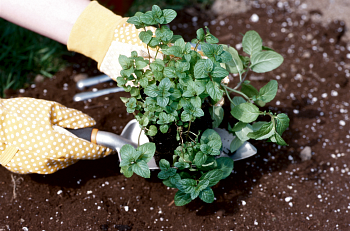
STEP 1 – Refer to the planting diagram on the left. Dig the planting hole the same depth as the container or rootball, but twice the width of the rootball. Remove debris such as roots and rocks. Dig the hole with straight sides and a flat bottom. Avoid digging a hole that is “bowl shapes”.
STEP 2 – Check to make sure that the crown of the plant is level with, or even slightly above, the existing soil line. Always handle a plant by its root system, and never by its trunk or branches.
A potted plant needs to have its container removed. To do this, hold one hand with fingers spread across soil and flip upside down with your other hand on the container’s bottom. Gently slide container off. If the plant is heavily “root-bound” (such as Azaleas and Rhododendrons) it will be necessary to loosen the roots with your hand, or butterfly the rootball with a knife before planting.
STEP 3 – Set the plant in the hole, straighten and tuen to show it’s best side. Mix 2 parts of existing soil with 1-part peat moss or compost. Be sure to moisten peat moss before use! It’s also beneficial to add a balanced granular fertilizer such as 5-10-5, Plantone or Roots-2 (follow manufactures recommendations).
Fill half of the hole around the rootball with the soil mixture and tamp gently to eliminate air pockets. Finish filling hole with soil mixture and tamp. Form a 2-3 inch “berm” (see diagram) around the edge of the hole with your extra soil.
This creates a reservoir to make watering more efficient. Fill the reservoir with water and allow it to soak in. Repeat this 2 more times.
If your plant is balled and burlapped, you can remove the rope and burlap from the top of the ball at this time. Carefully cut them away with a sharp knife or a pair of shears. If the rootball has a wire basket around it, simply bend the handles down to the ground. Do not attempt to remove the basket! It will quickly disintegrate if left alone.
MULCHING – The importance of using mulch around new plantings cannot be overemphasized! We usually recommend bark mulch.
Mulch prevents weed growth and provides a finished appearance, but more importantly it allows the soil to retain moisture for longer periods of time. Lay mulch around the plant 2-3 inches deep but do not pack it against the trunk or branches. This can sometimes lead to insect and disease problems. Add new mulch every year or so as it decomposes into the soil.
WATERING – Water is crucial to the survival of your new plantings! A good rule of thumb is “The smaller the plant, the faster it will dry out”!
Rainfall is not enough to sustain new plantings. During the initial 3 month “critical period”, plan on watering smaller plants 2 or 3 times a week and larger plants 1 or 2 times a week. Keep aware of hot, windy or dry periods and compensate with additional watering. Fewer deep waterings are much more beneficial than lightly sprinkling your plants every day or two. Avoid using a sprinkler, as these are intended for lawns, not for shrubs and trees. Try to water plants in the early morning when possible (to help avoid potential disease problems), though any time will do! Focus on watering the base of the plant, and avoid wetting the flowers and foliage when possible. Shady areas tend to become very dry during the summer months! Please supply adequate water during this time. Give evergreens a final deep watering in mid-to-late November before the soil starts to freeze. This will help to minimize “Winter Burn”.
INSTRUCTIONS FOR PERENNIALS AND SMALLER SHRUBS – Using a garden hose with a water-wand or a nozzle attached, apply water gently, but directly to the reservoir for 20-30 seconds. You may need to do this in 5 second intervals so you don’t “break the dam”…
INSTRUCTIONS FOR LARGER SHRUBS AND TREES – Once or twice a week, (or as needed) fill the reservoir with water and allow it to soak in. this usually takes 2-5 minutes. Very large shrubs and trees may require even more! Please note that periods of drought can endanger even well established plantings. Broadleaf evergreens (such as Hollies, Rhododendrons, and Pieris) are particularly sensitive to drying out!
These plants will also greatly benefit from one final deep watering in late November or early December before the soil freezes. This can sometimes substantially reduce the risk of “winter kill”.
INSECT AND DISEASE PROBLEMS – Most plants are fairly trouble-free once they are established, but new plantings are inder stress form being moved and transplanted. These plants are particularly susceptible to pests and disease problems that are already present in their new environment. If you suspect a problem, it is very important that you take measures immediately. Because it is very easy to misdiagnose a problem when only given a verbal description of the plant’s symptoms, we strongly recommend that you bring in one or more fresh cuttings of the damaged plant in a sealed plastic bag or other airtight container. With these, our staff can more accurately identify the problem and recommend a cure.
A FINAL NOTE – Please remember that this is only a guide. Soil conditions, microclimate, and several other elements need to be considered when planting and caring for your plants. Please don’t hesitate to call us at 203-762-5511 (in Wilton) and 203-266-9136 (in Woodbury) or stop by for additional information if you encounter a problem.
HAPPY GARDENING!


